Friday, August 28, 2015

TEACCH Tasks Friday

Today is going to be the first post for TEACCH Tasks Friday. Every Friday I will be sharing tasks that are set up following the TEACCH Model approach.  I will also give a shor explanation of the tasks. These tasks will focus on a variety of things: such as life skills, math, reading, vocational skills, writing skills, and more. 
1. 
This task is a fine motor. The students work on putting a pencil grip and an eraser on a pencil. The task is done from left to right and after the put on the pencil grip and the eraser they will put the pencil in the finished basket.

2. 
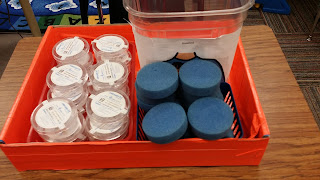
This is another fine motor task. This task is also completed from left to right. The students begin by opening the clear container and placing the blue foam in the container. They will replace the lid and put the  finished container in the finshed bucket.

3.  
This is a life skills task and it is done from left to write. The student will pull out a board and match the condiments to the correct the food. Once the board is complete they will put it in the finished basket.

4
This is a math task and it focuses on weight. The student will take the item and decided if the item weighs more than 100 pounds or less them 100 pounds. After they complete each board they will place it in the finished basket.
5.
This is a math task. The students will decide if they have enough money to buy the object by placing the card in the square that says I have enough money or I don't have enough money. When they complete each card they will place it in the finished basket.

These are the tasks for this week, stay tuned for next weeks tasks. If you would like to share some of your tasks be sure to comment on this post and send me some pictures and I would love to share the tasks. You can also email me as well at embracingdifferences@outlook.com

Wednesday, August 26, 2015

Independent Work Area

Today I will be talking about my independent work area in my classroom. This area is set up similar to my writing area. Below are numerous images showing this area.

This image shows the entire area. On the left hand side you can see the pocket where the students will match the picture card from their schedule. Once they match their card they will go to the front of the desk and take the numbers and match them to the basket with the same number. They will complete the work and then place the finished work on the finished basket. They will have three numbers to match. Since I only have two students and a total of three shelves, I have a row of baskets for each of the students. When I get more students I will change the work out for each student on the different shelves. Deciding what work goes in the baskets depends on what you are working on with the student. I will usually work one on one with a student working on their IEP goals. The work or tasks I created for the student will go in the baskets. Also the work that should go in the baskets are work the student should already know how to do and should just be a review and not brand new work.  Just for your information, I got the the numbered baskets from IKEA.

To help keep the work organized for the baskets I will use this hanging planter to keep the students work organized by dividing into sections for the students work.

Next to the pocket for the area I also have a clip board for the data forms I use to collect data on the students when they are working. I also post a reminder board for staff reminding them how the independent work station should be run. This area should be run how it sounds independently. The student should not be given any help unless they are struggling with focusing and not working. When this is the case less verbal prompts is better. What usually helps is non-verbal prompts such as pointing to the desk to work or pointing to the basket that they need to work on next. It depends on what the student is struggling with at that time. Once the student is working the teacher or the para-professional should take the data on how the student is working and what they are struggling with.


Monday, August 24, 2015

Writing Area

In this weeks post I will be discussing my writing area. To begin lets look at some of the pictures of the area.


Writing is a very important skill for students with autism to have. They my struggle with holding the pencil. I like to have the students work in this area on a daily basis to not only practing writing, but to work on holding the pencil the correct way.  Since my classroom is structured for the TEACCH Model I have a pocket with the writing area symbol on the outside. This is where the students will will match the symbol they took from their schedules. You can see the pocket in the first picture.

In the second picture you can see the overall layout of the writing area. On the right hand side of the picture you can see where the pocket with the symbol is located. Next to the pocket you can see a white hanging container. The container is actually a planter that I got at IKEA. I use this to hold the students writing work for the week. Since I currently only have two students I place their work in file folders and when I am setting up the area their work is ready and at my finger tips. On the left side of the picture you can see a clipboard hanging from the divider. I use this clipboard to collect data on how the student is doing in the area. I would use this data to make modifications for the student as well as use the information I get in the students IEP.

In the third picture I did a close up of the work area. On the left hand side of the picture you can see a board with numbers attached to the partition. This is a work schedule that the student needs to follow. There are numbers one through three and then the students name card is located next to the three. There is also numbers one through three listed on the cart on the desk. The student will start by taking the number one from the work schedule and match it to the one on the basket. They will pull out the work and complete it. Once they complete the work they will put it in the finished basket on the right of the desk. They will continue these steps with work two and three. Once they finish all of the tasks they will go back to their work schedule and get their name card to go and check their schedule. When the students are working they need to complete the tasks from left to right. This will help them stay organized and follow a structure to help them complete the work.

Now you may be thinking that this is great, but your students are unable to write and are unable to grasp a pencil. No worries. I would incorporate writing activities that would use velcro to create work where they could match letters to spell their name or they would put words in order to create sentences. These are just some ways to incorporate tasks for those students who are unable to write. 

So that is how I set up the writing area in my classroom. My next post will be how I set up my independent work area.

Monday, August 17, 2015

Back To School

It is that time of year again back to school. I am going into my second week of school, but have faced many challenges up to this point.  I have started a new position teaching a k-2 functional autism class in a brand new autism program. I currently have two students who are great. Since I have only two students it has given me the opportunity to really put my focus on making sure my classroom is fully structured and following the teach model. My goal has been to become a certified TEACCH trainer as well as ABA certified. Having two students lets me work on this as well as create fun filled tasks and activites for the students. The next couple of blogs will focus on the different areas in my classroom and how they are set up for the TEACCH Model.  I will also be throwing in some posts sharing with you my new products that will be for sale in store. I am going to post a before picture of my classroom so you can see what it looked like prior to the set up.


This past summer I was lucky enough to get tickets to attend San Diego Comic Con. After attending this amazing event I decided I wanted to do a superhero autism theme for my classroom. Here are some of the things I created in this theme.


The next blog will be about how I set up my writing area.